PDN for Digital Scrapbooking
PDN is short for Paint Dot Net, a FREE photo editing & image creating software.
SECTION 5
A BASIC BEGINNER TUTORIAL FOR A SIMPLE FIRST LAYOUT
In the prior steps you have learned about getting scrap kits, found an assortment of nice free scrap kits, zip software, various functions and tools of PDN, starting your layout, putting images on your layout, sizing images, working with multiple images, layers, the drop shadow effect, plugins and now we're almost done, but before my layout is done I want to add some text on my layout. Now you are going to CREATE a layer, which is very easy.
Step 26: Creating a layer, using text functions, the "color picker" and your color palette.
After I create my new layer and name it "text" I'm going to go to my tool window (Step 16) and first select my color picker then click on the layer named "My Background". Next I'm going to use my mouse to touch and click the color picker onto an area of "My Background" image in order to find a color I like that matches my layout to use for my text so it blends nicely with the layout
Look at your color palette to see each color you are touching your color picker to. After you find a color you want to use for your text click on your newly created text layer in the layer box to highlight it in blue so that you only type on your new text layer, not another image in the layer box. Now go to your tool window and select the text tool, which is also the letter "T".
ONLY after you have selected (clicked on) your text tool within the tool window can you change the size, style, and alignment of your text (fonts) at the top of PDN using the text menu. You can select another text style and even center it. (See above image for more information on text functions once the text tool on your tool window has been selected/clicked on).

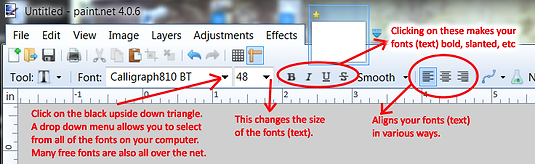

Above is an image of the text tool bar. It becomes activated for use when you click on the text tool (the letter "T") within the tool window. Here is a little more about it: http://www.getpaint.net/doc/latest/TextTool.html

You are about to learn the final step, which is saving your completed work. Before that last step I want to explain a few things about that final process. There are two ways to save your final layout. As a common practice for your future layouts, I recommend that you use both.
The first way is to save your completed layout as a PDN file. Doing so allows you to work on it later in a very time saving way. Some of those reasons could be maybe you will want to use the same layout for another photo, to change only the background or to make coordinated sets of layouts. Maybe you will discover you spelled a word wrong in your text. Maybe a friend or relative really liked it and wants you to make the same layout for one of their photos, too. Regardless, there are many reasons you will want to save your work, once completed, in a way that allows you to easily edit it---even if you don't think so at the time.
You also need to save you completed layout as a .jpg or .png image file. A few of those reasons are that both are common file formats used at a number of places, easily sent in emails or from cellular devices, iPads, tablets, etc. Professional printing companies use them and various social media websites. You can save your layout as a .png file then later open that same .png in Paint Dot Net to RESAVE it as a .jpg image file. I had to resave completed layouts and photos to use at Shutterfly, for it's photo book making process. At this time, unless their policy has recently changed, Shutterfly photo book printing company only allows you to upload your images in .jpg format. (I simply rename them when I resave them from a .png to a .jpg so I have my original .png layout or image. I print out completed layouts or images on my home computer using .png format. You can also do a Google search for the difference between a .jpg file and .png file.
NOTE: even in the beginning stages of making a layout you can save your layouts in the PDN file format every time you add an image or do something to the layout. If you lose power on your computer or the PDN program closes on you unexpectedly, for whatever reason, at least you won't lose your work and have to spend more time starting over again. What if the computer you are using is shared by others and you walk away from the computer for a moment while another person or child closes the PDN program, not realizing they lost all of your work. Just some food for thought.
Now my layout is complete. All I have to do now is save my layout in 2 different file formats. The first is a .pdn file format, just in case I want or need to edit it at a later time. I also need to save my layout as a .png image file format or .jpg......(or both .png & .jpg, optional)

Step 27: Saving your completed work in two different file formats; .pdn and . png, (and/or .jpg --optional)
To begin the final process, go to your menu bar in the top left area of PDN. Click on "File" then "Save as" from the drop down menu that will appear. Follow the rest of the instructions given.


Now your entire layout has been saved in the Paint Dot Net .pdn file. All that is left is to save your entire layout as a .png image file. Follow the steps below.


You are done with your entire layout.
Digital Scrapbooking with Paint Dot Net
Questions or comments may be directed to pdnscrapbooking @ gmail dot com (Due to spam everyone is sick of, I didn't write it the traditional way.)